
3-Ingredient Breaded Chicken Cutlets
These super easy breaded chicken cutlets are are crispy on the outside, juicy on the inside, and an easy high protein dinner that you can get on the table in under 30 minutes! Pair it with pasta or roasted vegetables for a quick dinner on busy weeknights.

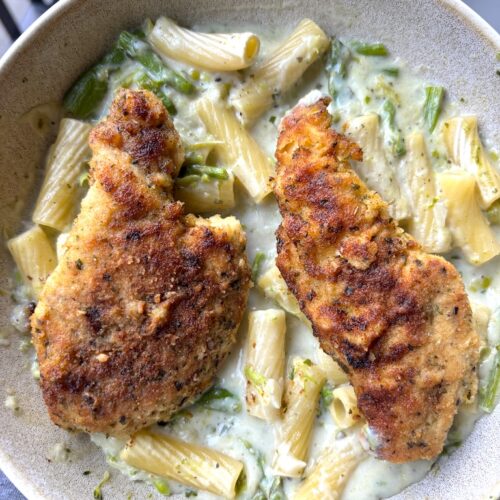
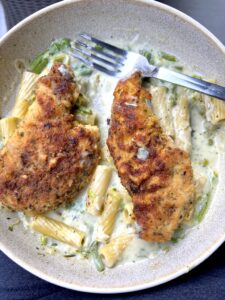
Served on top of Trader Joe’s Rigatoni Alla Contadina
⏰ TIME: 25 mins | 🤑COST: $7.74
🍗 3 INGREDIENTS
The following text may contain Amazon affiliate links. As an Amazon Associate, I earn a small commission from qualifying purchases made through links on this post at no additional cost to you.
I know I say that every recipe is my favorite, but these breaded chicken cutlets may may legit be the one. I’ve made it like 50 times by now, it’s that good! 🤣
It’s become my go-to recipe when I need a quick, healthy, high protein dinner on busy weeknights. And it’s made with just 3 ingredients and ready in under 30 minutes! Which is a complete win in my book.
🍗 Looking for more chicken dinners? Check out this roundup featuring 21 rotisserie chicken recipes (all made with 5 ingredients or less!)
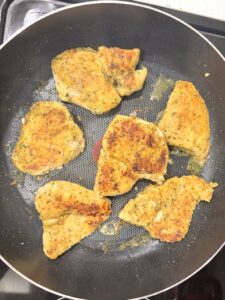
The key to this recipe is pan-frying it in the skillet. I’ve tried making breaded chicken cutlets in the oven and air fryer before, but nothing beats pan-fried chicken cutlets. They turn out super crispy yet juicy on the inside. Guess it’s better than deep frying, right?!
These breaded cutlets make a great addition to pasta dishes like this simple garlic butter parmesan pasta. You can also serve it alongside roasted/air-fried vegetables (like these breaded zucchini sticks), on on top of a simple caesar salad, or even inside a chicken caesar wrap!
The possibilities are literally endless with this recipe. Even kids will love this dish that looks so much like chicken tendies!


Why You’ll Love This Recipe
There are so many different reasons to love these breaded chicken cutlets!
🍗 These breaded chicken cutlets are:
- Made with just 3 ingredients
- High protein
- Ready in under 30 minutes
- Freezer-friendly
- Budget-friendly
- Great for meal prep
- Pairs well with a lot of dishes
While it’s not completely keto, it is relatively low in carbs. I still find it pretty satisfying even though I’m a carbaholic.
I’ve made this recipe in a pinch after a long day at work, and also as part of my weekly meal prep when I don’t have a lot of time to make something elaborate.
Serving Suggestions
These breaded cutlets are great for dinner, but also make really delicious leftovers for lunch the next day! Here are my some of my favorite accompaniments for this chicken:
- On top of rice or pasta dishes
- On top of salad (chicken caesar salad is my fav!)
- Put it inside a sandwich or wrap
- Serve with your favorite veggies like breaded zucchini, mashed potatoes, or steamed veggies
- Serve it with garlic bread or dinner rolls
- As a base for chicken parmesan


Left: Served on top of Trader Joe’s Rigatoni Alla Contadina
Right: Served on top of a chicken caesar salad kit
Ingredients & Substitutions

- Thin-sliced chicken breasts: You can use regular chicken breasts, but I recommend cutting them in half length-wise or pounding them until thin. This helps the chicken cook more evenly.
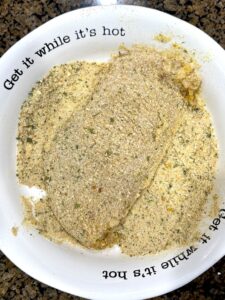
- Italian breadcrumbs: Adds flavor without needing additional spices or seasonings. Regular breadcrumbs or panko breadcrumbs can also be used, but it won’t give you as much flavor.
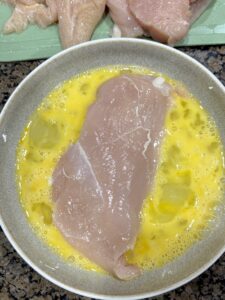
- Eggs: Helps the breadcrumbs stick to the chicken. I’ve found that using eggs is the best way to make the breadcrumbs stick to the chicken!
📌 OPTIONAL INGREDIENTS: Add grated or shredded parmesan cheese to the breadcrumbs to give it a cheesy flavor.
Equipment You’ll Need


The product links above are affiliate links. As an Amazon Associate, I earn a small commission from qualifying purchases made through these links at no additional cost to you.
- Large skillet: Make sure to use the largest skillet you have to cook as many chicken cutlets as possible at one time. I used my trusty T-fal deep skillet for this recipe.
- Shallow bowls (2): I like using pasta bowls for this. One shallow bowl is for coating the chicken in the egg. The other shallow bowl is for coating the egg-dipped chicken breasts in the breadcrumbs.
- Tongs (optional) : Not necessary, but tongs makes it so much easier to flip the chicken in the skillet without accidentally scraping off the breading!
How To Make the Breaded Chicken Cutlets


Storage Instructions
- Make Ahead: Bread the chicken cutlets up to 24 hours in advance and store them covered in the refrigerator until ready to cook. You can also pan-fry a batch of chicken cutlets and store them in an air-tight container in the fridge for up to 3 days.
- Fridge: Allow the cooked chicken cutlets to cool completely. Store leftover chicken cutlets in an airtight container in the refrigerator for up to 3 days.
- Freezer: Allow the cooked chicken cutlets to cool completely. Freeze in a freezer-safe container or freezer bag for up to 3 months.
- Reheating: You got a few options here! I recommend reheating in a skillet, oven, or air fryer to keep the chicken cutlets crispy. Microwaving will work in a pinch too, but the breading won’t stay as crispy.
- Skillet: Heat in oil-coated skillet over medium heat for 2-3 minutes per side until warmed through.
- Oven: Bake at 375°F for 10-15 minutes, flipping halfway through.
- Air Fryer: Reheat at 350°F for 3-5 minutes, flipping halfway through.
- Microwave: Heat in 30-second intervals until warmed through (fair warning – the breading won’t stay as crispy with this method).

The Printable Recipe Card
3-Ingredient Breaded Chicken Cutlets
Equipment
- Large skillet
- 2 Shallow bowls
- Tongs (optional)
Ingredients
- 1 lb thin-sliced chicken breasts
- ½ cup Italian-style breadcrumbs
- 2 large eggs
Pantry staples
- 2-3 tbsp olive oil (or 1-2 tbsp butter for extra flavor!)
Instructions
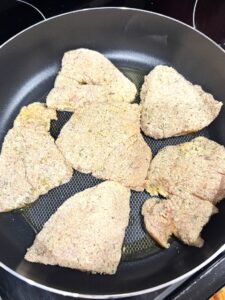
- Assemble the ingredients. Whisk the eggs in one of the shallow bowls. In the second shallow bowl, add the Italian breadcrumbs.
- Prep the chicken. Dip the chicken breast into the egg mixture, allowing the excess to drip off.
- Press the egg-coated chicken into the breadcrumbs. Flip and repeat on the other side. Press firmly so the crumbs stick on. You may have to flip and press several times until each side is well coated in the breadcrumbs.
- Repeat steps 2 and 3 for all of the chicken breasts.
- Cook the chicken. Heat olive oil or butter in a large skillet over medium-high heat. Once hot, add the chicken cutlets in a single layer. Work in batches if needed.
- Cook for about 4-5 minutes per side, until each side is golden brown and the chicken is no longer pink on the inside.
- Serve and enjoy with pasta, rice, salad, or inside a sandwich!
Notes
- Thin-sliced chicken breasts cook quickly, so watch carefully to avoid overcooking which will dry out the chicken.
- Make sure to coat the chicken breast very well with the egg mixture! Undercoating may cause the breadcrumbs to fall off more easily.
- Cook in batches if needed to avoid overcrowding the skillet.
- Leftovers can be used in salads, sandwiches, and wraps throughout the week!
- On top of rice or pasta dishes
- On top of salad (chicken caesar salad is my fav!)
- Put it inside a sandwich or wrap
- Serve with your favorite veggies like breaded zucchini, mashed potatoes, or steamed veggies
- Serve it with garlic bread or dinner rolls
- As a base for chicken parmesan
Did you make this recipe? Let me know how it went!
I’m always open to suggestions, comments, or feedback on tweaking my recipes. If something wasn’t clear or if you think a step could be done better, or you added your own edits to this recipe, send me a message!
Unfortunately, I’ve had to disable comments due to the large number of spam links & comments from unsafe sites. I’m hoping to add the comments section back once I can find a good spam blocker plugin!