
Homemade Baked Cheese Crisps (Made With Just 1 Ingredient!)
These crispy homemade baked cheese crisps are a delicious high-protein snack that you can make with just one ingredient—shredded cheese! Enjoy the cheese crisps on their own or as a crunchy topping for soups or salads.

⏰ TIME: 15 mins
🤑TOTAL COST: $2.00
🧀 1 INGREDIENT
Got a handful of leftover cheese in the fridge, but have no idea what to do with it? I’ve got the most life-changing recipe for you today: 1-ingredient baked cheese crisps!
Yes, you read that right. With just 1 ingredient, you can make these cheese crisps that are high protein, low carb, and super delicious!
🥨 Want more snack ideas? Download my FREE PDF of 101 snack ideas!
This is honestly my new favorite way to use up leftover shredded cheese that would otherwise go to waste. Why throw away that extra cheese from taco Tuesday when you can turn it into a cheap snack in just 15 minutes?!
Plus, they literally cost $2 to make. Which is way cheaper than the tiny $5 bag of Whisps you can buy from the grocery store!
🍎 More Kid-Friendly Snacks
- After School Snack Recipes
- Baked Cheese Crisps
- High-Protein Smoothie Recipes
- Yogurt Popsicle Recipes
- 101 Snack Ideas (+FREE Printable)

Need snack ideas? 🍿
Sign up for my email list & I’ll send you a FREE printable PDF with 101 snack ideas! As a bonus for signing up, you’ll also get a brand new meal plan with 5-ingredient recipes sent to your inbox each month! 💖
Why You’ll Love This Recipe
🧀 These baked cheese crisps are:
- Made with just 1 ingredient
- High protein
- Low carb
- Ready in 15 minutes
- Great as a snack!
I love eating these cheese crisps plain as a snack, but you can also serve them on a cheese board, crumble them on top of soup or salad, or pair them with a sandwich for a filling lunch. They’re also great inside school lunchboxes or served as an after school snack.
You can use any kind of firm cheese that shreds well for this recipe. I used parmesan cheese but cheddar would be a yummy alternative.
Serving Suggestions
- Eat them plain!
- Crumble on salads and soups
- Put it in a school lunchbox
- Give it as an after-school snack
- Add it to a charcuterie board
- Sprinkle on top of casseroles
- Make DIY lunchables
- Pair it with a dip
Ingredients & Substitutions

The only thing you’re going to need for this recipe is some shredded cheese! I recommend shredding a fresh wedge of cheese, but you can also use a bag of pre-shredded cheese for this recipe.
I used parmesan cheese because that’s what I had in the fridge, but you can use any firm cheese that shreds well. Cheddar, Monterey jack, pepperjack, gouda, or even asiago cheese would be suitable picks.
PSA: the Trader Joe’s cheese section is the best cheese section ever. Go check it out.
📌 OPTIONAL INGREDIENTS: If you want to elevate your cheese crisps, you can add a dash of garlic powder, Italian seasoning, paprika, or black pepper!
Equipment You’ll Need
The following text may contain Amazon affiliate links. As an Amazon Associate, I earn a small commission from qualifying purchases made through links on this post at no additional cost to you.
- Baking sheet – a large baking sheet to bake your cheese crisps on
- Parchment paper – so your cheese crisps don’t stick to the baking sheet. It also makes it easy to clean up afterwards!
- Cheese grater – I like using a large grater like this one


The product links above are affiliate links. As an Amazon Associate, I earn a small commission from qualifying purchases made through these links at no additional cost to you.
How to Make the Baked Cheese Crisps


Storage Instructions
- Cool completely before storing: Let the crisps cool fully on a wire rack. This helps them firm up and prevents condensation, which can make them soggy
- Store in an airtight container: Once cooled, transfer cheese crisps to an airtight container. Keep them at room temperature for up to 3 days
- Re-crisp if needed: If your crisps soften, just pop them in a toaster oven or air fryer for 1-2 minutes. Let them cool again before eating
- Do not freeze: Parmesan crisps tend to lose their texture and become chewy after freezing, so it’s best to enjoy them fresh or store at room temp in small batches

The Printable Recipe Card

Baked Cheese Crisps
Equipment
- Baking sheet
- Parchment paper
- Cheese grater
Ingredients
- 1 cup shredded cheese (freshly grated or pre-shredded)
Instructions
- Preheat the oven to 400℉.
- Shred the cheese if you're using a fresh block or wedge of cheese.
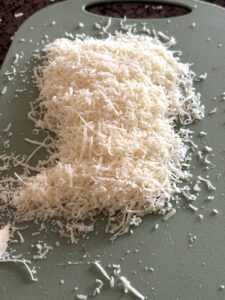
- Arrange on baking sheet. Line the baking sheet with parchment paper. Make 10-12 mounds of shredded cheese on the baking sheet, using 2-3 tablespoons of shredded cheese per mound. Space each mound about 2 inches apart. Lightly flatten the top of each mound.
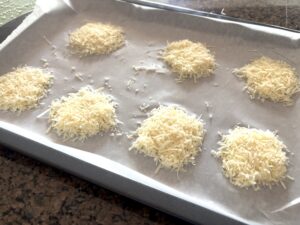
- Bake for 7-8 minutes or until the edges are golden and the cheese is bubbly. Baking times may vary, so watch your crisps closely after the 5-minute mark.
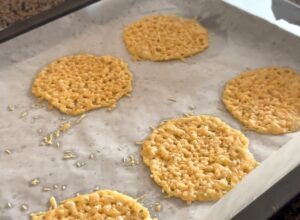
- Remove from oven and let the crisps cool on the baking sheet for 3 minutes, then transfer to a wire rack to crisp up fully.
- Serve and enjoy!
Notes
- Don’t crowd the pan – the cheese will spread as it bakes, so make sure to leave space in between each cheese mound
- Watch the oven closely – every oven is different, so keep a close eye especially towards the end. Baking times may also vary depending on how thick your cheese mounds are. You can bake them in the oven for a little longer if you like them extra crispy!
- Top with seasonings for an extra flavor boost – try mixing the shredded cheese with garlic powder, paprika, everything bagel seasoning, Italian seasoning, or even a little pepper before baking
✏️ More 5-Ingredient Back to School Recipes
- After School Snack Recipes
- High Protein Breakfast Recipes
- School Lunch Ideas
- 101 Snack Ideas (+FREE Printable)
🍎 More Kid-Friendly Snacks
- After School Snack Recipes
- Baked Cheese Crisps
- High-Protein Smoothie Recipes
- Yogurt Popsicle Recipes
- 101 Snack Ideas (+FREE Printable)

One Comment
Comments are closed.